Skip to content
Injoys
How-to

Checklist for Window Conditions Before Installing a Window Air Conditioner

Whether a window air conditioner can be installed cannot be determined by the window type alone. You must also check the window frame’s effective height, depth, and level differences, the rail shape, handle interference, outdoor exhaust space, and bracket specifications.

Views 26 11 min read KO EN JA ES

Listen or read this article

Listen, or read the text only.

Checklist for Window Conditions Before Installing a Window Air Conditioner

Kokoro 82M AI-generated voice

0:00 15:10

Download audio

File name
window-air-conditioner-window-installation-checklist-en.mp3
Format
MP3 (audio/mpeg)
Duration
15:10
File size
10.4 MB
Engine
Kokoro 82M

This audio was generated by AI.

You may download and use it freely for personal use.

Checklist for Window Conditions Before Installing a Window Air Conditioner

12 min read

Checklist for Window Conditions Before Installing a Window Air Conditioner
Whether a window air conditioner can be installed cannot be determined by the window type alone. You must also check the window frame’s effective height, depth, and level differences, the rail shape, handle interference, outdoor exhaust space, and bracket specifications.
Standard brackets are generally designed primarily for horizontally sliding windows, but the installation manual for each product determines final compatibility.
Window height must be measured as the effective distance between the lower and upper window frames where the bracket actually makes contact, not by the size of the glass.
An extension kit is generally a component that increases the supported height range; it does not resolve insufficient frame depth, severe level differences, or handle interference.
Even drill-free installation can leave compression marks, peeling paint, adhesive residue, or window frame deformation, so it must be distinguished from damage-free installation.
If the bracket is twisted or exterior fall prevention is uncertain, stop the DIY installation and check the manufacturer’s official installation standards.
A window air conditioner is not an appliance that can be installed simply by placing it by a window. The window frame that supports the air conditioner's weight, the installation panel that separates indoors from outdoors, and the outdoor-side space that vents hot air must all meet the installation requirements.
Even with the same type of sliding window, the outcome can vary depending on the window frame's height and depth, differences in rail levels, protruding handles, and double-window construction. Therefore, before purchasing, you should first record the window structure in photos and measurements in millimeters, then compare them against the installation manual for the relevant model, rather than focusing on the product name.
Basic Criteria for Installation Feasibility
A window air conditioner can be considered installable only when all three of the following conditions are met.
· Support capability: The window frame and mounting bracket must be able to support the product's weight securely. · Dimensional compatibility: The window frame's usable height, depth, and shape must fall within the range supported by the standard mounting bracket or an extension kit approved by the manufacturer. · Ventilation and safety conditions: Heat from the condenser must be able to escape outdoors, and the risks of rainwater ingress, condensation, falling, and electrical hazards must be manageable.
If even one of these conditions is uncertain, you should not conclude that installation is possible merely because the unit “fits in the window.” Minimum and maximum installation heights, permitted window frame shapes, and fastening methods vary by product, so the official installation manual for the relevant model is the final authority.
Basic Installation Requirements by Window Type
Window type | General assessment | Items that must be checked Horizontal sliding window | This is the type generally assumed by standard window air conditioner mounting brackets. However, installation may be restricted depending on the rail and sash structure. | Usable height, window frame depth, rail level differences, sash handle, insect screen position Vertical sliding window | It is safest to consider installation only for models that explicitly specify a dedicated installation method. Parts intended for horizontal sliding windows must not be arbitrarily rotated and reused. | Window type stated in the product manual, load-bearing position, panel orientation Casement window | The hinges and the sash's turning radius often make this type incompatible with standard mounting brackets. Removing the sash or making a custom panel requires a separate structural assessment. | Availability of a dedicated kit, opening fixation structure, fall prevention, ability to restore the window to its original condition Double window | Even if the unit can be mounted on the indoor window frame, it cannot be used if the outer sash blocks the exhaust vent. Heat must not become trapped in the space between the two windows. | Alignment of inner and outer sashes, outer window opening width, exhaust path, interference from the insect screen Wooden window or wooden frame | Even if the dimensions match, clamping force and moisture can cause dents, cracks, or discoloration. It is safer not to install the unit on deteriorated wood. | Wood rot or cracks, fastening-point strength, whether a protective plate is permitted, rental restoration requirements Fixed window | Because there is no opening, installation using a standard mounting bracket is difficult. | Whether there is a separate opening or professional installation method approved by the manufacturer
Window terminology may be used differently by sellers and users. When making an inquiry, do not send only the phrase “sliding window.” For an accurate assessment, also prepare photos showing the entire window, lower rail, upper rail, handle, and outdoor-facing side.
How to Measure the Window and Window Frame
Use a metal tape measure or rigid ruler, and record all values in millimeters. A fabric tape measure can bend and cause measurement errors.
1. Choose the sash and installation side
· Choose whether the air conditioner will be placed on the left or right. · Check whether another sash, railing, wall, insect screen, or stored object is in front of the outdoor-side exhaust vent. · Confirm that the required opening width is actually available when the window is opened.
2. Measure the usable height
The usable height is not the height of the glass. It is the distance from the surface contacted by the lower mounting section to the surface contacted by the upper mounting section.
· Measure the left, center, and right sides separately. · If the three values differ, the window frame may be tilted or warped. · Unless the manufacturer instructs otherwise, use the smallest value when assessing compatibility. · Do not arbitrarily include the inside of a deep groove or a rubber seal; measure based on the surfaces the mounting bracket will actually contact.
3. Measure the window frame depth and rail shape
Measure the front-to-back depth of the lower window frame and the width of the flat surface on which the mounting bracket can rest. Even if the overall window frame is wide, the actual support area may be narrow because of rails, raised edges, or drainage grooves.
Record the following items.
· Total depth from the indoor-side edge to the outdoor-side edge · Width of the flat surface the mounting bracket can contact · Level difference between the highest raised edge and the lowest groove · Locations of rounded rails, sloped surfaces, protruding screws, and drainage holes
4. Measure how far the handle and locking devices protrude
The sash handle, latch, or auxiliary locking device may interfere with the installation panel. Check both with the window closed and with it opened as far as required for installation.
· Measure how far each protruding part extends from the window frame surface. · Confirm that there is enough space to turn or fold the handle. · Do not force the panel against the handle and secure it on top.
5. Check outdoor-side conditions
· Confirm that another sash or insect screen does not block the exhaust intake or outlet. · Maintain the outdoor-side clearance required by the manufacturer. · Check for a reverse slope that could direct rainwater indoors or a blocked drainage path. · Stop the DIY installation if you would need to lean beyond a railing or fasten parts from the exterior wall.
Measurement Record
Measurement item | Value or condition to record Window type | Sliding window, casement window, vertical sliding window, double window, etc. Usable height | Left, center, and right, each in mm Available opening width | mm Total lower window frame depth | mm Width of flat support surface | mm Maximum rail level difference | mm Maximum handle protrusion | mm Outdoor exhaust obstruction | Present or absent, with a photo of its location Window frame material and condition | Aluminum, synthetic resin, wood, etc., and presence of cracks or corrosion Power source location | Distance to a grounded wall outlet and confirmation of its rating
How to Check the Standard Mounting Bracket and Extension Kit
The standard mounting bracket has a minimum and maximum supported installation height. If the window is taller than the standard range, an extension kit designated by the manufacturer for that model may be added, but the following distinctions must be understood.
· An extension kit usually increases the installation height range. · An extension kit does not automatically resolve insufficient window frame depth or irregular rails. · Parts for another model or from another manufacturer cannot be assumed to be compatible because their hole locations and load designs differ. · The manual must be checked to determine whether multiple extension parts may be connected together. · Even if the height is within the permitted range, installation is not possible if a connection point interferes with the handle or sash.
When comparing products, do not look only at the “maximum window height.” Check the following information as well.
· Minimum and maximum installation heights of the standard mounting bracket · Applicable height range and compatible model names for each extension kit · Diagrams showing permitted window frame depths and rail shapes · Whether required fastening screws or auxiliary locking devices are included · Minimum outdoor-side clearance and drainage requirements
The Difference Between No-Drill and Damage-Free Installation
No-drill installation generally means a fastening method that does not require holes to be drilled in the window frame or wall. However, it does not mean that no marks will be left on the window frame.
Possible marks and damage include the following.
· Dents or deformation caused by the mounting bracket's clamping force · Scratches and paint peeling caused by friction from metal parts · Residue or discoloration from sealing materials and double-sided adhesives · Compression and poor recovery of rubber seals · Cracking, moisture absorption, or surface delamination of wooden window frames · Rail damage caused by repeatedly opening and closing the sash
In addition, even if the product body is secured without drilling, auxiliary locking devices or safety components may require screws. The component descriptions and fastening steps in the installation manual should take precedence over advertising claims.
In a rental home, it is safest to photograph the condition of the window frame before installation and ask the landlord or property manager whether drilling, adhesives, or sash removal is permitted.
Common Problems with Double Windows and Insect Screens
With double windows, securing the product on the indoor side alone is not sufficient. The air conditioner's outdoor-side heat exchanger must have access to outside air.
· If the outer sash covers the exhaust vent, hot air may become trapped between the windows. · If discharged hot air is drawn back into the intake, cooling efficiency may decrease and the unit's temperature may rise. · A dense or dirty insect screen may restrict airflow. · If installation requires removing the insect screen or outer window, separate measures must be considered for fall prevention, insect protection, and security. · Check that condensation and rainwater collecting between the windows do not flow into the indoor window frame.
Avoid arbitrarily cutting the insect screen or attaching a plastic duct to the exhaust vent unless the manufacturer permits such an installation method.
Safety Conditions That Require Stopping DIY Installation
If any of the following applies, do not place the product in position or operate it temporarily. It is safer to request an on-site assessment through the manufacturer's official support service or an installation technician.
· The window frame wobbles or is cracked, or shows corrosion, rot, or deformation. · The mounting bracket does not make flat contact and tilts or twists to one side. · The window height or window frame dimensions fall outside the ranges permitted by the manual. · Parts would need to be connected together without a dedicated extension kit. · You would need to lean beyond a railing to fasten outdoor-side components. · The area below the window is a walkway, or the window is on a high-rise exterior wall and a reliable fall-prevention structure cannot be provided. · The exhaust vent is blocked by a sash, wall, railing, or insect screen. · Rainwater or condensation could flow toward indoor electrical components or the outlet. · The grounding condition and outlet rating cannot be confirmed, or the power cord is damaged. · A power strip, extension cord, or adapter plug prohibited by the manual would be required. · A custom-made wooden, acrylic, or metal panel would need to support the unit's weight.
In particular, lifting the air conditioner into its installation position can be difficult for one person because of the product's weight and the posture required. If the manual requires two people or you cannot lift it securely, arrange for another person to assist.
Final Pre-Purchase Assessment Procedure
· Identify the window type and choose the sash to be used for installation. · Take photos of the entire window, upper and lower rails, handle, and outdoor-facing side. · Measure the usable height, opening width, support-surface depth, and level differences in millimeters. · Find the permitted ranges in the installation manual for the exact model you plan to purchase. · If the measurements exceed the standard mounting bracket's range, check the applicable range of the official extension kit for that model. · Check for interference from the handle and locking devices, the outer sash of a double window, and the insect screen. · Inspect the exhaust space, rainwater and condensation paths, fall prevention, and power requirements. · If even one item cannot be determined from the drawings alone, send photos and actual measurements to the manufacturer's official installation support channel.
Statements such as “installation is possible in most cases” on online answers or sales pages do not guarantee the structural safety of an individual window frame. To receive a meaningful installation assessment, you must provide the exact model name, photos of the window, and actual measurements together.
0:00 0:00
1 / 56

Download text

File name
window-air-conditioner-window-installation-checklist-en.txt
Format
TXT (text/plain)
Paragraphs
56

Downloads exactly what you see as a text file.

Please cite the source when quoting.

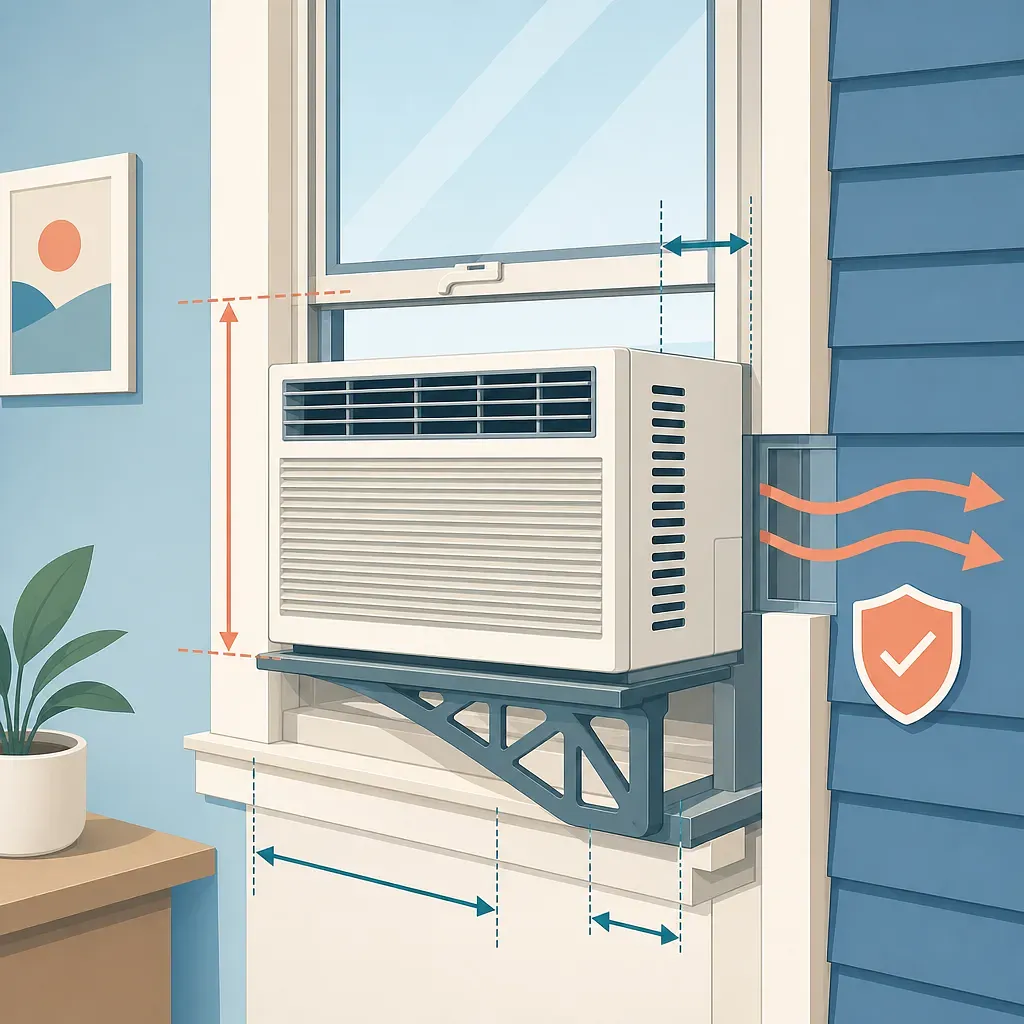
The diagram shows the window dimensions, support bracket, and exhaust clearance to check before installation.

Key points

  • Standard brackets are generally designed primarily for horizontally sliding windows, but the installation manual for each product determines final compatibility.
  • Window height must be measured as the effective distance between the lower and upper window frames where the bracket actually makes contact, not by the size of the glass.
  • An extension kit is generally a component that increases the supported height range; it does not resolve insufficient frame depth, severe level differences, or handle interference.
  • Even drill-free installation can leave compression marks, peeling paint, adhesive residue, or window frame deformation, so it must be distinguished from damage-free installation.
  • If the bracket is twisted or exterior fall prevention is uncertain, stop the DIY installation and check the manufacturer’s official installation standards.

A window air conditioner is not an appliance that can be installed simply by placing it by a window. The window frame that supports the air conditioner's weight, the installation panel that separates indoors from outdoors, and the outdoor-side space that vents hot air must all meet the installation requirements.

Even with the same type of sliding window, the outcome can vary depending on the window frame's height and depth, differences in rail levels, protruding handles, and double-window construction. Therefore, before purchasing, you should first record the window structure in photos and measurements in millimeters, then compare them against the installation manual for the relevant model, rather than focusing on the product name.

Basic Criteria for Installation Feasibility

A window air conditioner can be considered installable only when all three of the following conditions are met.

  1. Support capability: The window frame and mounting bracket must be able to support the product's weight securely.
  2. Dimensional compatibility: The window frame's usable height, depth, and shape must fall within the range supported by the standard mounting bracket or an extension kit approved by the manufacturer.
  3. Ventilation and safety conditions: Heat from the condenser must be able to escape outdoors, and the risks of rainwater ingress, condensation, falling, and electrical hazards must be manageable.

If even one of these conditions is uncertain, you should not conclude that installation is possible merely because the unit “fits in the window.” Minimum and maximum installation heights, permitted window frame shapes, and fastening methods vary by product, so the official installation manual for the relevant model is the final authority.

Basic Installation Requirements by Window Type

Window type General assessment Items that must be checked
Horizontal sliding window This is the type generally assumed by standard window air conditioner mounting brackets. However, installation may be restricted depending on the rail and sash structure. Usable height, window frame depth, rail level differences, sash handle, insect screen position
Vertical sliding window It is safest to consider installation only for models that explicitly specify a dedicated installation method. Parts intended for horizontal sliding windows must not be arbitrarily rotated and reused. Window type stated in the product manual, load-bearing position, panel orientation
Casement window The hinges and the sash's turning radius often make this type incompatible with standard mounting brackets. Removing the sash or making a custom panel requires a separate structural assessment. Availability of a dedicated kit, opening fixation structure, fall prevention, ability to restore the window to its original condition
Double window Even if the unit can be mounted on the indoor window frame, it cannot be used if the outer sash blocks the exhaust vent. Heat must not become trapped in the space between the two windows. Alignment of inner and outer sashes, outer window opening width, exhaust path, interference from the insect screen
Wooden window or wooden frame Even if the dimensions match, clamping force and moisture can cause dents, cracks, or discoloration. It is safer not to install the unit on deteriorated wood. Wood rot or cracks, fastening-point strength, whether a protective plate is permitted, rental restoration requirements
Fixed window Because there is no opening, installation using a standard mounting bracket is difficult. Whether there is a separate opening or professional installation method approved by the manufacturer

Window terminology may be used differently by sellers and users. When making an inquiry, do not send only the phrase “sliding window.” For an accurate assessment, also prepare photos showing the entire window, lower rail, upper rail, handle, and outdoor-facing side.

How to Measure the Window and Window Frame

Use a metal tape measure or rigid ruler, and record all values in millimeters. A fabric tape measure can bend and cause measurement errors.

1. Choose the sash and installation side

  • Choose whether the air conditioner will be placed on the left or right.
  • Check whether another sash, railing, wall, insect screen, or stored object is in front of the outdoor-side exhaust vent.
  • Confirm that the required opening width is actually available when the window is opened.

2. Measure the usable height

The usable height is not the height of the glass. It is the distance from the surface contacted by the lower mounting section to the surface contacted by the upper mounting section.

  • Measure the left, center, and right sides separately.
  • If the three values differ, the window frame may be tilted or warped.
  • Unless the manufacturer instructs otherwise, use the smallest value when assessing compatibility.
  • Do not arbitrarily include the inside of a deep groove or a rubber seal; measure based on the surfaces the mounting bracket will actually contact.

3. Measure the window frame depth and rail shape

Measure the front-to-back depth of the lower window frame and the width of the flat surface on which the mounting bracket can rest. Even if the overall window frame is wide, the actual support area may be narrow because of rails, raised edges, or drainage grooves.

Record the following items.

  • Total depth from the indoor-side edge to the outdoor-side edge
  • Width of the flat surface the mounting bracket can contact
  • Level difference between the highest raised edge and the lowest groove
  • Locations of rounded rails, sloped surfaces, protruding screws, and drainage holes

4. Measure how far the handle and locking devices protrude

The sash handle, latch, or auxiliary locking device may interfere with the installation panel. Check both with the window closed and with it opened as far as required for installation.

  • Measure how far each protruding part extends from the window frame surface.
  • Confirm that there is enough space to turn or fold the handle.
  • Do not force the panel against the handle and secure it on top.

5. Check outdoor-side conditions

  • Confirm that another sash or insect screen does not block the exhaust intake or outlet.
  • Maintain the outdoor-side clearance required by the manufacturer.
  • Check for a reverse slope that could direct rainwater indoors or a blocked drainage path.
  • Stop the DIY installation if you would need to lean beyond a railing or fasten parts from the exterior wall.

Measurement Record

Measurement item Value or condition to record
Window type Sliding window, casement window, vertical sliding window, double window, etc.
Usable height Left, center, and right, each in mm
Available opening width mm
Total lower window frame depth mm
Width of flat support surface mm
Maximum rail level difference mm
Maximum handle protrusion mm
Outdoor exhaust obstruction Present or absent, with a photo of its location
Window frame material and condition Aluminum, synthetic resin, wood, etc., and presence of cracks or corrosion
Power source location Distance to a grounded wall outlet and confirmation of its rating

How to Check the Standard Mounting Bracket and Extension Kit

The standard mounting bracket has a minimum and maximum supported installation height. If the window is taller than the standard range, an extension kit designated by the manufacturer for that model may be added, but the following distinctions must be understood.

  • An extension kit usually increases the installation height range.
  • An extension kit does not automatically resolve insufficient window frame depth or irregular rails.
  • Parts for another model or from another manufacturer cannot be assumed to be compatible because their hole locations and load designs differ.
  • The manual must be checked to determine whether multiple extension parts may be connected together.
  • Even if the height is within the permitted range, installation is not possible if a connection point interferes with the handle or sash.

When comparing products, do not look only at the “maximum window height.” Check the following information as well.

  1. Minimum and maximum installation heights of the standard mounting bracket
  2. Applicable height range and compatible model names for each extension kit
  3. Diagrams showing permitted window frame depths and rail shapes
  4. Whether required fastening screws or auxiliary locking devices are included
  5. Minimum outdoor-side clearance and drainage requirements
The Difference Between No-Drill and Damage-Free Installation

No-drill installation generally means a fastening method that does not require holes to be drilled in the window frame or wall. However, it does not mean that no marks will be left on the window frame.

Possible marks and damage include the following.

  • Dents or deformation caused by the mounting bracket's clamping force
  • Scratches and paint peeling caused by friction from metal parts
  • Residue or discoloration from sealing materials and double-sided adhesives
  • Compression and poor recovery of rubber seals
  • Cracking, moisture absorption, or surface delamination of wooden window frames
  • Rail damage caused by repeatedly opening and closing the sash

In addition, even if the product body is secured without drilling, auxiliary locking devices or safety components may require screws. The component descriptions and fastening steps in the installation manual should take precedence over advertising claims.

In a rental home, it is safest to photograph the condition of the window frame before installation and ask the landlord or property manager whether drilling, adhesives, or sash removal is permitted.

Common Problems with Double Windows and Insect Screens

With double windows, securing the product on the indoor side alone is not sufficient. The air conditioner's outdoor-side heat exchanger must have access to outside air.

  • If the outer sash covers the exhaust vent, hot air may become trapped between the windows.
  • If discharged hot air is drawn back into the intake, cooling efficiency may decrease and the unit's temperature may rise.
  • A dense or dirty insect screen may restrict airflow.
  • If installation requires removing the insect screen or outer window, separate measures must be considered for fall prevention, insect protection, and security.
  • Check that condensation and rainwater collecting between the windows do not flow into the indoor window frame.

Avoid arbitrarily cutting the insect screen or attaching a plastic duct to the exhaust vent unless the manufacturer permits such an installation method.

Safety Conditions That Require Stopping DIY Installation

If any of the following applies, do not place the product in position or operate it temporarily. It is safer to request an on-site assessment through the manufacturer's official support service or an installation technician.

  • The window frame wobbles or is cracked, or shows corrosion, rot, or deformation.
  • The mounting bracket does not make flat contact and tilts or twists to one side.
  • The window height or window frame dimensions fall outside the ranges permitted by the manual.
  • Parts would need to be connected together without a dedicated extension kit.
  • You would need to lean beyond a railing to fasten outdoor-side components.
  • The area below the window is a walkway, or the window is on a high-rise exterior wall and a reliable fall-prevention structure cannot be provided.
  • The exhaust vent is blocked by a sash, wall, railing, or insect screen.
  • Rainwater or condensation could flow toward indoor electrical components or the outlet.
  • The grounding condition and outlet rating cannot be confirmed, or the power cord is damaged.
  • A power strip, extension cord, or adapter plug prohibited by the manual would be required.
  • A custom-made wooden, acrylic, or metal panel would need to support the unit's weight.

In particular, lifting the air conditioner into its installation position can be difficult for one person because of the product's weight and the posture required. If the manual requires two people or you cannot lift it securely, arrange for another person to assist.

Final Pre-Purchase Assessment Procedure

  1. Identify the window type and choose the sash to be used for installation.
  2. Take photos of the entire window, upper and lower rails, handle, and outdoor-facing side.
  3. Measure the usable height, opening width, support-surface depth, and level differences in millimeters.
  4. Find the permitted ranges in the installation manual for the exact model you plan to purchase.
  5. If the measurements exceed the standard mounting bracket's range, check the applicable range of the official extension kit for that model.
  6. Check for interference from the handle and locking devices, the outer sash of a double window, and the insect screen.
  7. Inspect the exhaust space, rainwater and condensation paths, fall prevention, and power requirements.
  8. If even one item cannot be determined from the drawings alone, send photos and actual measurements to the manufacturer's official installation support channel.

Statements such as “installation is possible in most cases” on online answers or sales pages do not guarantee the structural safety of an individual window frame. To receive a meaningful installation assessment, you must provide the exact model name, photos of the window, and actual measurements together.

Images

The diagram shows the window dimensions, support bracket, and exhaust clearance to check before installation.
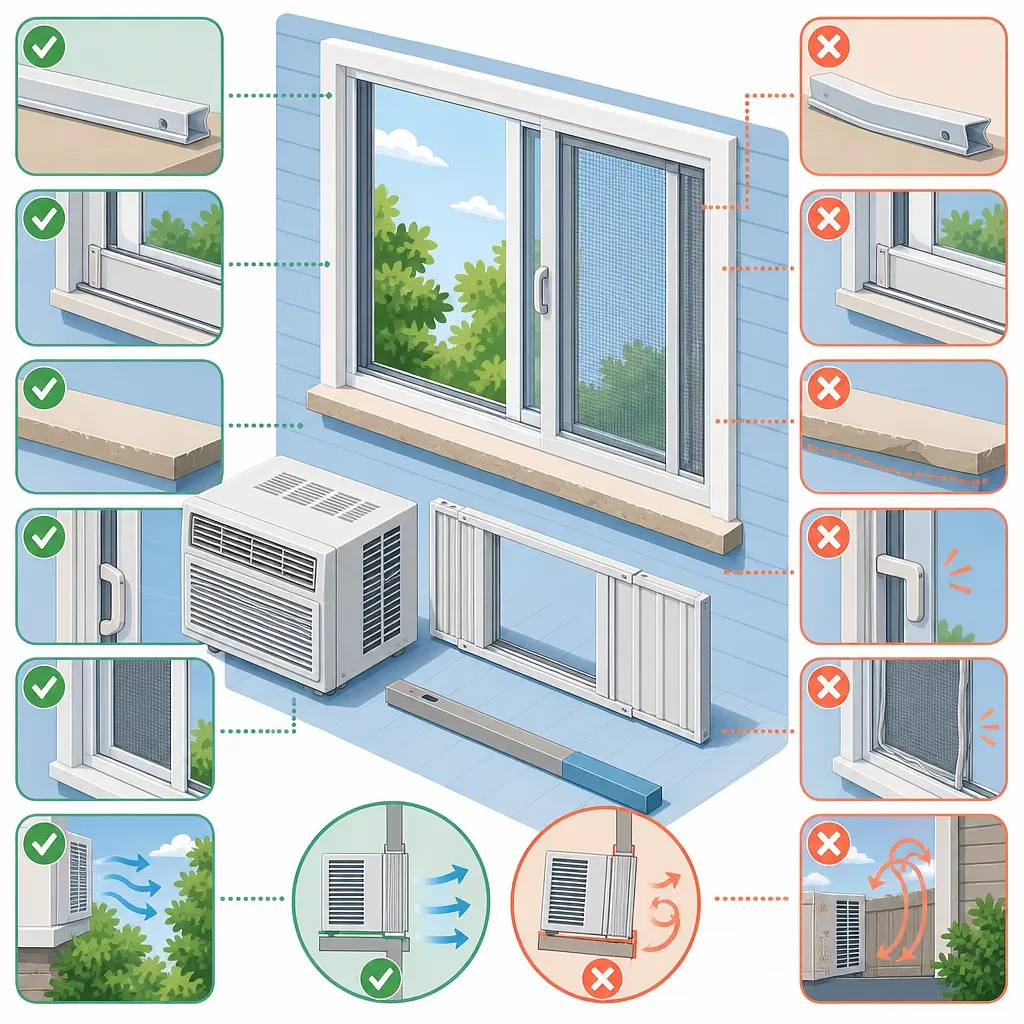
The guide highlights level frames, adequate clearance, secure fittings, and unobstructed outdoor airflow.

FAQ

Can all window air conditioners be installed in sliding windows?

No. Sliding windows are the type of window that standard mounting brackets are primarily designed for, but the usable height, window frame depth, rail height difference, handle position, and interference with the outer window and insect screen must all meet the product requirements.

From where to where should the window height be measured?

Measure not the height of the glass, but from the surface that the lower mounting section actually contacts to the surface that the upper mounting section contacts. Measure the left, center, and right separately, and if there are differences, check the window frame for tilting or deformation as well.

If the window is too tall, is adding an extension kit all that is needed?

An extension kit is primarily a component that increases the installation height range. It does not resolve insufficient window frame depth, a significant rail height difference, handle interference, or an unstable window frame, and you must confirm that it is officially compatible with the air conditioner model.

Can a window air conditioner be installed in a casement window?

Standard mounting brackets for sliding windows often do not fit the hinges and pivoting structure of casement windows. If the manufacturer does not specify an installation method or a dedicated kit for casement windows, it is safer not to install the unit by fabricating a custom panel or removing the window sash.

Can the outer window be closed with double windows?

The air conditioner's outdoor-side intake and exhaust vents must be open to the outside air, so the outer window must not block the exhaust. Check the position of the window sashes and how far they are open to prevent hot air from becoming trapped between the two windows or being drawn back in.

Do no-drill products leave no marks at all on the window frame?

No-drill essentially means that no holes are drilled. Compression marks, scratches, paint damage, adhesive residue, or deformation of rubber seals may occur, so it should not be interpreted as guaranteeing damage-free installation.

Can a no-drill mounting bracket be used on a wooden window?

Even if the dimensions fit, the condition of the wood and its resistance to compression must be checked. Do not install it if there is rot, cracking, moisture damage, or surface peeling, and consider using a protective plate only to the extent permitted by the manufacturer.

Can a window air conditioner be used with the insect screen left in place?

It depends on the distance between the product and the insect screen and the airflow. If the insect screen blocks the outdoor-side intake or exhaust or causes hot air to be drawn back in, it may need to be removed or repositioned, so check the clearance requirements for the specific model.

Can I install it myself if the window frame height is within the installation range?

Height is only one of several conditions. The window frame strength, depth of the supporting surface, rail height difference, mounting bracket level, outdoor exhaust clearance, fall prevention, drainage, and power requirements must all be satisfied as well.

When should I consult an authorized installer?

Stop the DIY installation if the window frame is bent or damaged, the mounting bracket contacts only one side, the dimensions are outside the permitted range, exterior work at a high elevation is required, or the exhaust, drainage, or power requirements are unclear. Providing the exact model name, photos of the window, and actual measurements in millimeters will help with the assessment.

Sources

Data formats

This content is available in several machine-friendly formats.

Data-only languages (machine translated, files only)

Indonesian JSON MD Portuguese JSON MD Chinese (Traditional) JSON MD Deutsch JSON MD

Reuse & AI usage

Search indexing and AI citation with attribution are welcome. See the license policy for details.

CC BY · License

Corrections · Improvements · Feedback Let us know what's wrong or could be better and we'll review it. No login required.

Comments (0)

Sign-in required

Sign in with your Google account to like and comment.

Be the first to comment.

Related content